
A dirty carburetor can really hurt your engine’s performance. It can cause poor fuel efficiency and less power. Regular maintenance is key to avoid these issues and keep your engine running well.
I’ll show you how to clean your carburetor. I’ll share important tips and steps to follow. Knowing the value of this maintenance will help you keep your engine in top shape.
Key Takeaways
- Understand the importance of regular carburetor maintenance.
- Learn the steps involved in cleaning a carburetor.
- Identify the tools needed for the task.
- Discover tips for maintaining your engine’s performance.
- Recognize the benefits of a clean carburetor.
Understanding the Carburetor’s Role in Your Engine
A well-functioning carburetor is key to your engine’s efficiency. It blends air and fuel for combustion. This is crucial for your engine’s performance.
What is a Carburetor?
A carburetor mixes air and fuel for your engine. It’s like the heart of older engines. Modern engines use fuel injection systems instead. Hagerty says knowing how it works is important for classic cars.
How Does a Carburetor Work?
The carburetor uses vacuum pressure to mix fuel and air. This mixture goes to the engine’s cylinders. It has parts like the float bowl, jets, and venturi.
As “The carburetor’s operation is a delicate balance of air and fuel”. Any problem can cause engine issues.how-to-clean-stainless-steel
Common Signs of a Dirty Carburetor
A dirty carburetor shows several symptoms. These include poor engine performance and hard starts. It also leads to less fuel efficiency.
If your engine is “running rough” or hard to start, it’s time to clean it. Regular maintenance keeps your engine running well.
Watch out for these signs:
- Difficulty starting the engine
- Poor engine performance or hesitation
- Decreased fuel efficiency
- Black smoke from the exhaust
Spotting these signs early helps fix problems before they get worse. Remember,
“A stitch in time saves nine.”
Regular checks and maintenance prevent big repairs later.
Safety Precautions Before Cleaning
When you’re about to clean your vehicle’s carburetor, safety comes first. Being well-prepared makes the job easier and safer.how-to-clean-suede-shoes
Protective Gear You Should Wear
Wearing the right gear is key when cleaning a carburetor. It protects you from chemicals and debris. You’ll need:
- Safety Glasses: Keep your eyes safe from splashes or debris.
- Gloves: Use gloves to avoid skin contact with harmful chemicals.
- Mask: A mask or respirator helps you avoid inhaling fumes.
Safety Procedures to Follow
It’s important to follow safety procedures when cleaning a carburetor. Here are some steps:
- Make sure your workspace is well-ventilated to avoid inhaling fumes.
- Disconnect the battery to prevent accidental engine starts.
- Check your vehicle’s manual for specific carburetor cleaning instructions.
Tools You’ll Need for the Job
Having the right tools makes cleaning more efficient. Here’s what you’ll need:
| Tool | Purpose |
|---|---|
| Screwdriver Set | For disassembling the carburetor |
| Cleaning Solution | To remove grime and varnish from components |
| Soft Brush | For gently scrubbing parts without causing damage |
By following these safety tips and using the right tools, you can clean your carburetor safely and effectively.
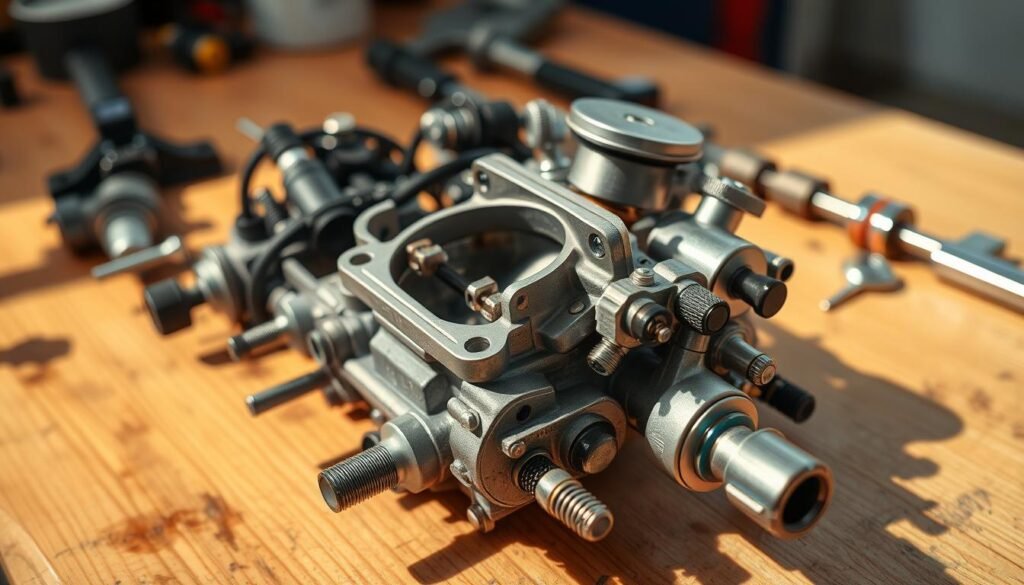
Disassembling the Carburetor
Disassembling the carburetor is key to keeping your engine running well. It lets you clean and check the parts that help your engine work right.
Preparing Your Workspace
Before you start, make sure your workspace is ready. It should be clean, well-lit, and free of clutter. You’ll need a screwdriver set, pliers, and a container for small parts.
A clean and organized workspace helps you work more efficiently. It also lowers the chance of losing small parts.how-to-clean-window-screens
Removing the Carburetor from the Engine
To take apart the carburetor, first remove it from the engine. Start by disconnecting the fuel line and any other attachments. Be careful with the fuel line to avoid spills.
After removing the carburetor, you can start taking it apart. It’s wise to check your vehicle’s manual for specific removal instructions for your model.
Identifying Key Components
As you take the carburetor apart, you’ll see important parts like the float bowl, jets, and air filter. Knowing what each part does is key for cleaning and upkeep.
The float bowl holds fuel for the engine. The jets mix air and fuel. The air filter keeps air clean before it enters the carburetor.
Understanding these parts helps you clean and maintain your carburetor. This improves your engine’s performance.
Cleaning Supplies You Need

Having the right cleaning supplies is key for a good carburetor cleaning. The right tools and solutions make the job easier and more effective.how-to-clean-headlights
Recommended Cleaning Solutions
You’ll need a good cleaning solution for your carburetor. I suggest using a carburetor cleaner made to tackle varnish and grime. Here are some top picks:
- Carburetor cleaners in aerosol cans
- Liquid carburetor cleaners for brush or cloth use
A leading auto expert says, “The right cleaning solution is crucial. It helps remove tough deposits without harming the carburetor.”
“Choose a cleaner that’s safe for your carburetor’s materials, like brass, aluminum, or other metals.”
Essential Cleaning Tools
You’ll also need some basic tools for cleaning. These are:
| Tool | Description |
|---|---|
| Soft-bristled brush | Gentle, yet effective at removing grime |
| Microfiber cloth | Great for wiping surfaces without leaving marks or lint |
| Compressed air | Helpful for clearing out debris from tight spots |
Optional Supplies for Better Results
For a deeper clean or to simplify the process, consider an ultrasonic cleaner. It’s great for cleaning small, detailed parts.
With the right cleaning supplies, you’re ready to clean your carburetor effectively.how-to-clean-dryer-vent
Step-by-Step Cleaning Process
To clean your carburetor well, follow this step-by-step guide. It has several key stages. These stages make sure your carburetor is clean and free of debris.
Initial Rinse of Components
Start by rinsing the carburetor parts with a cleaning solution. This removes loose debris. It also stops dirt from spreading during the cleaning process.
For the best cleaning solutions, check out CRC Industries’ guide on carburetor cleaning.
Soaking Parts in Cleaning Solution
After rinsing, soak the parts in a carburetor cleaning solution. This step is key for removing tough grime and varnish. Make sure the solution is right for your carburetor’s parts.
| Component | Soaking Time | Recommended Solution |
|---|---|---|
| Float Bowl | 30 minutes | CRC Carburetor Cleaner |
| Jets and Needles | 1 hour | CRC Carburetor Cleaner |
| Main Body | 2 hours | CRC Carburetor Cleaner |
Scrubbing and Detailing
After soaking, use a soft-bristled brush to scrub off grime or varnish. Focus on small orifices and details. For hard grime, a special tool might be needed.
Then, rinse the parts well with clean water. This removes the cleaning solution and debris. Check for dirt and repeat if needed.how-to-clean-a-washing-machine
Reassembling the Carburetor

After cleaning the carburetor, it’s time to put it back together. This step is key to keeping your engine running well. You need patience and focus to make sure everything fits right and works well.
Ensuring All Components Are Clean
Before you start putting it back together, check each part for dirt. Cleaning is important because dirt can mess up how the carburetor works. Use compressed air to dry and clean off any leftover cleaning solution.how-to-clean-a-cast-iron-skillet
Inspect each part carefully: Look for any signs of wear or damage. If you find any damaged parts, it’s best to replace them for the best performance.
Proper Way to Reassemble the Parts
Putting the carburetor back together means following the reverse of how you took it apart. Make sure every part goes back to its original spot.
- Start by reassembling the smaller components, such as the float and needle valve.
- Next, reattach the main jet and idle mixture screw.
- Lastly, put back any covers or caps you removed.
Refer to your vehicle’s manual if you’re unsure about the correct order or if there are specific instructions for your carburetor model.
Additional Checks Before Reinstallation
After you’ve put the carburetor back together, do a few checks. Make sure the float is at the right level, the choke and throttle work smoothly, and there are no leaks.
| Check | Description | Expected Outcome |
|---|---|---|
| Float Level | Ensure the float is at the correct level. | Proper fuel flow |
| Choke and Throttle | Check that the choke and throttle are working smoothly. | Smooth operation |
| Leak Test | Inspect for any signs of fuel leaks. | No leaks detected |
By following these steps, you can ensure your carburetor is properly reassembled and ready for reinstallation. This careful approach will help keep your engine running well and last longer.
Reinstalling the Carburetor
Now that the carburetor is clean, it’s time to put it back in place. This ensures your engine runs smoothly. It’s key for your vehicle’s performance.how-to-clean-an-oven
Aligning the Carburetor with the Engine
To start, align the carburetor with the engine’s intake manifold. Make sure the mounting flange fits right and all gaskets are clean. This step is important to avoid leaks or a bad fit.
Connecting Fuel and Air Lines
Then, connect the fuel and air lines to the carburetor. Fuel lines must be tight to avoid leaks. Air lines should connect right to keep the air-fuel mix correct. For more on this, see the guide on cleaning a carburetor.
Tightening Bolts and Fasteners Securely
It’s crucial to tighten bolts and fasteners well to keep the carburetor in place. Use a torque wrench to tighten to the right torque. This keeps it secure without over-tightening.
| Component | Tightening Sequence | Torque Setting |
|---|---|---|
| Carburetor Mounting Bolts | Cross-pattern | 15 ft-lbs |
| Fuel Line Fittings | Clockwise | 10 ft-lbs |
| Air Line Clamps | Sequential | 5 ft-lbs |
By following these steps and making sure connections are tight, you can reinstall your carburetor right. This boosts your engine’s performance and keeps it running longer.
Testing After Cleaning

After cleaning your carburetor, it’s key to test it for the best engine performance. This step makes sure everything works right and your engine runs smoothly.
Key Steps to Test your Carburetor
To test your carburetor well, follow these steps:
- Start the engine and let it warm up.
- Check for any leaks around the carburetor.
- Monitor the engine’s performance for any irregularities.
Adjusting the Idle and Mixture Settings
Adjusting the idle and mixture settings is vital for your engine’s balance. Here’s a simple guide:
| Setting | Adjustment | Expected Outcome |
|---|---|---|
| Idle | Turn the idle screw clockwise to increase RPM, counterclockwise to decrease. | Smooth idling without stalling. |
| Mixture | Adjust the mixture screw to achieve the highest RPM, then fine-tune for the best performance. | Optimal engine performance without hesitation. |
Common Issues to Monitor
After testing and adjusting your carburetor, watch out for these common issues:
- Leaks: Check for fuel leaks around the carburetor and its connections.
- Poor Performance: Monitor the engine’s performance for any signs of hesitation or stumbling.
- Idle Issues: Ensure the engine idles smoothly without stalling.
Troubleshooting Common Problems
Even with a clean carburetor, problems can still happen. You might face engine performance issues, fuel leaks, or starting troubles. Knowing how to solve these problems can save you time and keep your engine running well.
Engine Performance Issues
If your engine isn’t running right, there are a few things to check. Look for vacuum leaks in the intake manifold and hoses. Also, make sure the air-fuel mixture is right, as the wrong mix can hurt performance.
- Check if the idle mixture screws are set right.
- Look at the spark plugs.
- Make sure the air filter is clean and not blocked.
A leading mechanic says, “A well-tuned carburetor is key for good engine performance. Getting the air-fuel mix right is essential.” Regular checks and tweaks can stop many problems.
Fuel Leaks and Drips
Fuel leaks are dangerous and can make your engine run poorly. Start by looking at the fuel lines and connections for damage or loose spots. Make sure all connections are tight and there are no cracks or holes in the lines.
- Tighten any loose connections.
- Replace any damaged or corroded fuel lines.
- Check the fuel tank for leaks.
Starting Difficulties
If starting your engine is hard, it might be due to carburetor issues. Check the choke to make sure it works right. Also, make sure the idle circuit is clean and adjusted well.
- Look at the spark plugs for wear or fouling.
- Make sure the battery is good and charged.
- Check if the starter motor works right.
By troubleshooting these common problems, you can find and fix issues that might be affecting your engine. Regular maintenance and checks can help avoid many of these problems.
Maintenance Tips for Longevity

To make your carburetor last longer, you need to keep it maintained. A few easy steps can help your carburetor work well. This keeps your engine running smoothly.
Regular Cleaning Schedule
It’s important to clean your carburetor regularly. You should do this every 6 to 12 months, depending on how much you use it. Regular cleaning boosts performance and makes your carburetor last longer.
Seasonal Maintenance Practices
Seasonal checks are also key. Before the weather gets really hot or cold, check your carburetor. Seasonal checks help find problems early, so you can fix them fast.
| Season | Maintenance Task | Benefits |
|---|---|---|
| Spring | Inspect and clean the carburetor | Prepares for warmer months, improves performance |
| Fall | Check for wear, replace parts if necessary | Ensures readiness for colder weather, prevents issues |
Using Quality Fuel and Additives
Choosing quality fuel and the right additives is crucial. Good fuel cuts down on varnish and gum buildup. Additives help clean your fuel system.
By following these maintenance tips, you can keep your carburetor in top shape. This supports your engine’s performance and longevity.
Special Considerations for Vintage Carburetors
Restoring vintage carburetors is all about the details. You need the right parts and the correct cleaning methods. It’s key to know the unique needs of older models.
Techniques for Older Models
Cleaning vintage carburetors requires gentle yet effective methods. Older models have parts that are more delicate. You must use the right cleaning solution to avoid damage.
Key techniques include:
- Soaking parts in a mild cleaning solution to avoid corrosion
- Using soft-bristled brushes to clean intricate parts without scratching them
- Avoiding harsh chemicals that can damage vintage materials
Sources for Vintage Parts
Finding the right parts for vintage carburetors can be tough. But, there are many resources out there. Specialty stores that focus on vintage parts often have what you need.
Some recommended sources include:
| Source | Description |
|---|---|
| Specialty Vintage Auto Stores | Stores that specialize in vintage automotive parts |
| Online Marketplaces | Websites like eBay or specialized forums |
| Vintage Car Clubs | Joining clubs dedicated to vintage cars can provide leads on parts |
Finding Expert Help
At times, it’s best to get help from experts. They know vintage carburetors inside out. This can include professional restorers or enthusiasts.
Tips for finding expert help:
- Attend vintage car shows and events
- Join online forums dedicated to vintage cars and carburetors
- Consult with local classic car restoration shops
When to Call a Professional
If you’re having trouble with your carburetor, it might be time to get help. A Briggs & Stratton repair dealer can offer the right advice. They can help make your engine run smoothly again.
Signs You Need Expert Assistance
Look out for engine problems, fuel leaks, or hard starts. If you’re not sure how to fix these, a mechanic is your best bet. They can help with issues you can’t handle yourself.
Choosing the Right Mechanic
Find a mechanic who knows your engine type. Check online reviews and ask for referrals. Make sure they’re certified. For more help, visit the Briggs & Stratton support page.
Understanding the Costs
Service costs vary by mechanic, location, and repairs needed. Always ask for a detailed estimate. If unsure, get a second opinion. This way, you avoid unnecessary expenses and make the best choice for your engine.


