
Dirty makeup sponges can cause breakouts and skin irritation. A study showed many sponges have harmful bacteria. To keep your skin healthy, it’s key to regularly clean your makeup sponges.
I’ll share tips on how to clean and maintain your makeup sponges. This way, they’ll stay in good shape and your skin will be healthy. By the end of this article, you’ll know how to keep your sponges clean and fresh.
Key Takeaways
- Effective methods for cleaning makeup sponges
- Tips for maintaining hygiene and preventing bacterial growth
- Simple tricks for extending the life of your makeup sponges
- Best practices for incorporating clean makeup sponges into your daily routine
- The importance of regular cleaning for a flawless makeup application
Why Cleaning Makeup Sponges is Essential
Cleaning your makeup sponges often is key to great makeup and healthy skin. A clean sponge means your makeup goes on smoothly and evenly.
Benefits of Clean Sponges
Using clean makeup sponges offers many benefits. They help your makeup look flawless and prevent skin infections. Clean sponges ensure your makeup is applied without streaks or patches.
They also stop bacteria buildup, which can lead to acne and other skin problems. Plus, clean sponges make your makeup last longer. Dirty sponges waste makeup by absorbing too much.
Risks of Dirty Sponges
Dirty makeup sponges can cause many skin issues. They harbor bacteria that leads to acne, breakouts, and infections. Applying makeup with a dirty sponge spreads bacteria, clogging pores and irritating your skin.
Dirty sponges also ruin your makeup look. They can cause streaks and apply makeup unevenly. It’s important to know that dirty sponges harm your skin and makeup quality.
Recommended Cleaning Frequency
How often to clean your makeup sponges depends on use. Clean them at least once a week if daily use. If less frequent, clean every two weeks.
Make cleaning a part of your beauty routine. Regular cleaning keeps your sponges effective and hygienic. This ensures your makeup goes on smoothly and evenly.
Common Types of Makeup Sponges
The makeup sponge world is full of choices. Each type meets different needs and tastes. Knowing what each offers helps you pick the right one.
Beauty Blenders: What You Need to Know
Beauty blenders are loved by many. They’re egg-shaped and blend makeup into your skin perfectly. To use them well, learn how to properly clean and maintain them.
For tips on cleaning other makeup tools, see our guide on how to clean makeup brushes.
Traditional Makeup Sponges Overview
Traditional sponges are made from porous materials. They’re good for applying and blending makeup. They come in many shapes and sizes, making them versatile.
To keep them in top shape, clean them regularly.
Silicone Sponges and Their Care
Silicone sponges are popular for their durability and easy cleaning. They’re also less likely to hold bacteria, making them clean to use. To care for your silicone sponge, wash it with mild soap and water. Let it air dry.
Best Cleaning Methods for Makeup Sponges
To keep your makeup looking great, it’s key to clean your sponges right. Regular cleaning ensures your makeup looks flawless and extends your sponge’s life.
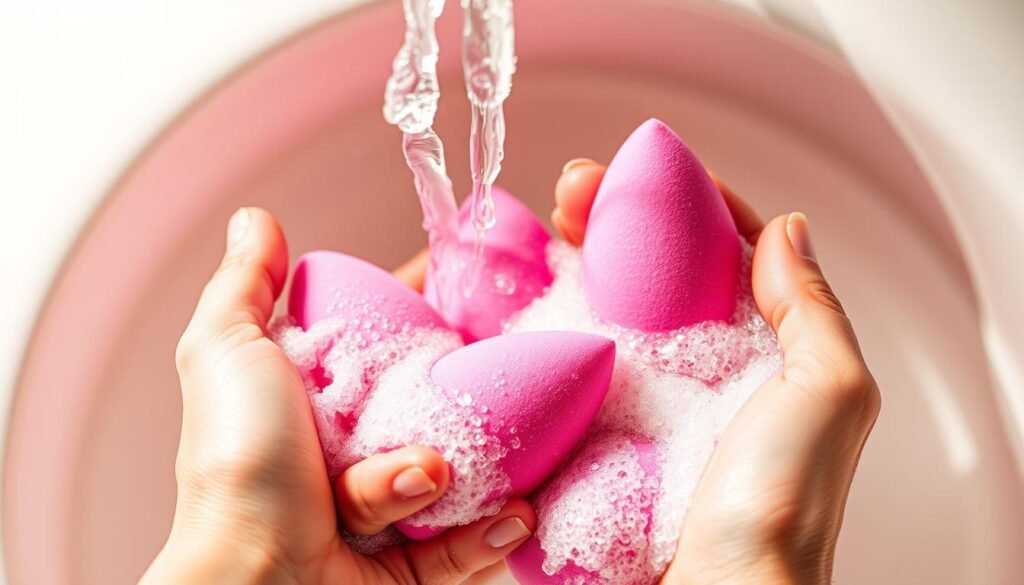
Soap and Water Method
Using soap and water is a simple yet effective way to clean your sponges. Wet your sponge under warm water, then add a bit of mild soap. Massage the soap into the sponge until it’s lathered. Rinse it well until the water is clear.
This method is soft on your sponge and gets rid of makeup well. For more tips, check out this guide on cleaning makeup sponges.
Vinegar and Water Soak
For a deeper clean, try a vinegar and water soak. Mix equal parts water and white vinegar in a bowl. Soak your sponge in it for 10-15 minutes. The vinegar’s acid breaks down tough makeup and sanitizes the sponge.
After soaking, rinse the sponge with warm water to get rid of vinegar smell.
Benefits of Vinegar Soak:
- Sanitizes the sponge
- Breaks down tough makeup residue
- Environmentally friendly
Microwave Method for Deep Cleaning
The microwave method is great for deep cleaning your sponges. Wet your sponge and microwave it for 20-30 seconds. The heat kills bacteria and loosens makeup residue.
Let the sponge cool, then rinse it under warm water. Be careful as it may be hot.
Note: Always check the manufacturer’s guidelines before microwaving your sponge, as not all materials are suitable for microwave cleaning.
Step-by-Step Guide to Cleaning Your Sponges

A clean makeup sponge is key for a smooth makeup look. To get this, you need to clean it right. Here’s how to clean your makeup sponges effectively.
Rinsing and Preparing the Sponge
First, rinse your makeup sponge under warm water to get rid of loose makeup. This step stops bacteria from spreading and makes cleaning better. Squeeze out the water to get it ready for the next step.
Applying Cleanser
After it’s damp, put a bit of cleanser on the sponge. You can use soap or a makeup sponge cleaner. Rub the cleanser into the sponge well. Make sure to clean every part, focusing on tough stains.
Rinsing and Drying Techniques
After the cleanser, rinse the sponge well until the water is clear. This removes any left-over cleanser and makeup. To dry, squeeze out water without wringing it. Lay it flat on a towel or hang it to dry, keeping it away from bacteria.how-to-clean-an-ice-maker
| Cleaning Step | Purpose | Tips |
|---|---|---|
| Rinsing | Remove loose makeup residue | Use warm running water |
| Applying Cleanser | Deep clean the sponge | Use gentle soap or specialized cleaner |
| Rinsing and Drying | Remove cleanser and residue, prevent bacterial growth | Rinse until water runs clear, air dry |
By following these steps, your makeup sponges will stay clean and work well. This means you’ll always look flawless.
Additional Tips for Safe Cleaning
Cleaning your makeup sponges safely is key for their life and your skin’s health. It removes makeup and stops bacteria buildup, which can harm your skin.
Avoiding Harsh Chemicals
Staying away from harsh chemicals is important. Harsh chemicals can damage the sponge material, making it wear out quicker. Choose gentle cleansers made for makeup sponges. These are safe and keep the sponge in good shape.
The Importance of Thorough Rinsing
It’s important to rinse well after using a cleanser. Leftover cleanser can irritate your skin next time you use the sponge. Rinse the sponge under water until it’s clean and free of soap. This keeps your sponge safe and clean.
Choosing the Right Cleanser
Picking the right cleanser is a big part of cleaning. Choose cleansers that are gentle and fit your sponge type. For example, beauty blenders need special cleansers. Reading reviews and product descriptions helps you choose wisely.
By following these tips, your makeup sponges will stay in great shape. They’ll keep applying makeup smoothly and evenly. Safe cleaning is not just for your sponges; it’s also for your skin’s health.
How Often Should You Replace Your Sponges?

Knowing when to replace your makeup sponge is key to a great beauty routine. Makeup sponges help you get a flawless look, but they don’t last forever.
Every day, I see my makeup sponge’s quality drop. It’s not just about cleaning it. The sponge itself gets worn out. So, how do you know when it’s time for a new one?
Signs It’s Time for a New Sponge
There are key indicators that show it’s time for a new sponge. These include:
- Visible wear and tear, such as tears or cracks in the sponge.
- Persistent stains that remain even after thorough cleaning.
- A noticeable decrease in the sponge’s performance, such as uneven makeup application.
- An unpleasant odor that lingers despite regular washing.
If you see any of these signs, it’s likely time for a new sponge. Using a worn-out sponge can lead to bad makeup and bacteria.
Factors Influencing Sponge Lifespan
The life of a makeup sponge depends on several things, including:
- How often you use it: Daily use shortens its life.
- The sponge’s quality: Better sponges last longer.
- How you care for it: Proper cleaning and storage help it last.
By knowing these factors and watching for signs, you can keep your makeup looking great and clean. Checking your sponge regularly is a simple way to keep your beauty routine working well.
DIY Cleaning Solutions for Makeup Sponges
I’ve found that making homemade cleaners for my makeup sponges is both affordable and gentle. It keeps the sponges in good shape and free from bacteria and buildup.how-to-clean-an-electric-blanket
Simple Ingredients You Can Use
Creating your own DIY cleaning solutions is easy. You just need mild soap, olive oil, and white vinegar. These are soft on the sponges but strong against makeup and bacteria.
For example, a mix of mild soap and warm water can clean the sponge gently. Or, a mix of equal parts water and white vinegar can get rid of tough makeup and sanitize the sponge.
Recipes for Homemade Cleaners
Here are a couple of recipes for homemade cleaners to try:
- Mix 1 tablespoon of mild soap with 1 cup of warm water. Soak the sponge in it for 10 minutes, then rinse well.
- Combine 1 part olive oil with 2 parts water. Rub this mix into the sponge to dissolve makeup, then rinse with warm water.
For more cleaning tips, check out milkmakeup.com. They have lots of methods and tips.
Using these DIY cleaning solutions saves money and helps the planet.
How to Care for Your Sponges Between Cleans

It’s important to take care of your makeup sponges between cleanings. This keeps them in top shape and your skin healthy. By doing so, your sponges will keep applying makeup smoothly.
Proper Storage Techniques
Storing your makeup sponges right is key to avoid contamination and damage. Here are some tips:
- Keep your sponges in a dry, cool spot away from sunlight.
- Use a container or mesh bag that lets air in.
- Don’t store sponges in airtight places or plastic bags. This can lead to bacteria growth.
Daily Maintenance Tips
Every day, taking care of your makeup sponges is crucial. Here are some habits to get into:
- Wash your sponge lightly after each use to get rid of makeup.
- Press out extra water without squeezing or twisting the sponge. This can harm it.
- Let the sponge dry completely before putting it away.
By sticking to these daily maintenance tips and proper storage techniques, you can make your makeup sponges last longer. They’ll stay in great condition.how-to-clean-acrylic-paint-brushes/
Prevention: Keeping Your Sponges Clean Longer
Keeping your makeup sponges clean is as important as cleaning them. A few simple steps can make your sponges last longer and stay cleaner.
Using Brushes Instead of Sponges
Using brushes for some makeup jobs can help keep your sponges clean. For example, brushes are great for applying foundation or powder. This way, less product goes on your sponge. As makeup artist Bobbi Brown once said, “The right tool can make all the difference in your makeup routine.” Brushes help avoid product buildup on your sponges.
Avoiding Product Build-Up
It’s key to avoid product buildup to keep your sponges clean. Use the right amount of makeup when applying with your sponge. Too much product can cause buildup, making your sponge dirty and possibly harboring bacteria.
Here are some tips to avoid product buildup:
- Start with a small amount of product and add more as needed.
- Dampen your sponge before applying makeup for even distribution.
- Clean your sponge regularly to prevent buildup.
By following these tips, you can keep your makeup sponges clean for longer. This ensures a flawless makeup look every time.
Common Mistakes When Cleaning Sponges

Cleaning makeup sponges is more than just wetting them and using soap. There are specific mistakes to avoid. Knowing these can help keep your sponges clean and extend their life.
Overusing Product and Water
One big mistake is using too much product and water. This can waste your cleanser and even harm the sponge. Too much water makes the sponge too wet, leading to a longer dry time and possibly bacteria growth.
To fix this, use just the right amount of cleanser and water. A gentle squeeze helps mix the cleanser without making the sponge too wet. Beauty experts say a little cleanser goes a long way for cleaning.
“The key to cleaning makeup sponges is moderation – not too much water, not too much cleanser.”
| Common Mistake | Consequence | Recommended Approach |
|---|---|---|
| Overusing product and water | Waste of product, potential damage to sponge | Use moderate amounts of cleanser and water |
| Neglecting to dry properly | Bacterial growth, reduced sponge lifespan | Dry sponges thoroughly after cleaning |
Neglecting to Dry Properly
Not drying your makeup sponges well after cleaning is a big mistake. Not drying them can cause bacteria to grow. This shortens the sponge’s life and can harm your skin.how-to-clean-ac-filter
To dry them right, squeeze out extra water after rinsing. Then, lay them out to dry in a well-ventilated area. Some people use a clean towel to soak up extra moisture. As shown in the table above, drying them well is key to keeping your sponges healthy and long-lasting.
By avoiding these common mistakes, you can keep your makeup sponges clean. This extends their life and ensures they apply makeup smoothly and evenly.
Eco-Friendly Cleaning Options
I’ve found great ways to clean makeup sponges without harming the planet. More people want to live sustainably, and the beauty world is listening. This includes how we clean our makeup tools.
Using biodegradable cleaners is a simple way to go green. These cleaners are made from natural stuff that easily breaks down. This makes your beauty routine kinder to the earth.
Biodegradable Cleaners
Biodegradable cleaners are good for the planet and work well on makeup sponges. Here are some good ones:
- Castile soap
- Baby shampoo
- White vinegar
These are soft, safe, and easy to rinse. They’re perfect for cleaning your sponges.
Reusable Cleaning Tools for Sponges
Using reusable tools is another way to cut down on waste. A silicone cleaning pad is great for gently scrubbing your sponges. It’s tough, easy to clean, and can be used many times.
“The simplest way to clean your makeup sponge is with soap and water. But for a deeper clean, try soap and olive oil or a special sponge cleanser.” – Beauty Expert
Let’s look at some eco-friendly cleaning methods:
| Cleaning Method | Eco-Friendliness | Effectiveness |
|---|---|---|
| Biodegradable soap | High | High |
| Reusable silicone pad | High | Medium |
| Vinegar soak | Medium | High |
By using these eco-friendly methods, you can keep your makeup sponges clean. And you’ll help make the world a greener place.
Conclusion: Embrace Freshness with Clean Sponges
Keeping your makeup sponges clean is key for a fresh and healthy look. By following the best practices, your sponges will stay in good shape. And your skin will stay clear and healthy.
Key Takeaways
Washing your makeup sponges regularly prevents skin problems like breakouts. It removes bacteria, leftover makeup, and dead skin cells. Clean sponges also help your makeup blend better and apply smoothly.
For more tips on washing your makeup sponges, check out Lemon8.
Maintaining Cleanliness
To keep your sponges clean, wash them every two to three weeks. Or after each use if you apply makeup heavily. Make sure to dry them properly and store them in a breathable container to avoid bacteria and mold.
Also, replace your makeup sponges every few months. This depends on how worn out they look.
By adding these simple steps to your beauty routine, you’ll get flawless makeup. And you’ll keep your skin healthy and glowing.


