
We keep things simple and safe when a leak shows up in a device or under a car hood.
First, we pause and pick protective gear. Small alkaline cells can sting skin, so we use tools and bag spent cells for disposal.
Next, we choose the right neutralizer for the job. Vinegar or lemon juice works on alkaline residue, then isopropyl alcohol removes oils. For vehicle terminals, a baking soda mix with water and a stiff brush clears deposits while we keep vents and caps safe.
We avoid sticky household sodas near electronics or engine bays. That advice saves time and prevents new problems.
Key Takeaways
- Use tools and gloves; never handle leaking cells with bare hands.
- Neutralize alkaline residue with an acid, then remove oils with alcohol.
- For cars, disconnect properly, clean away from vent caps, and dry thoroughly.
- Avoid soda; it leaves residue that harms parts.
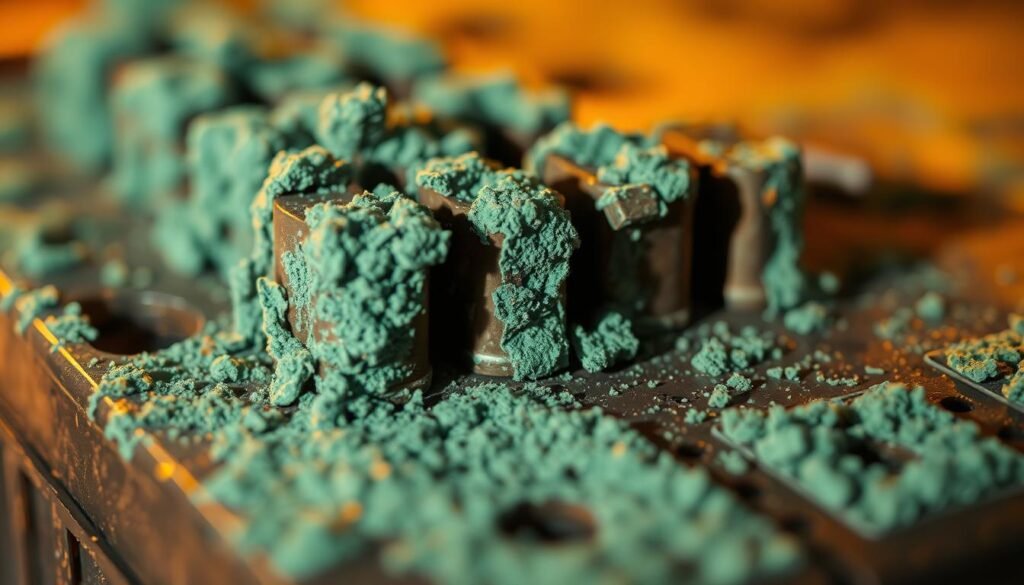
- Inspect colors of deposits—white, green, or blue can hint at the metal involved.
What we’re tackling and why it matters right now
We’re tackling visible buildup that can leave a device or car dead when we need it most.
Corrosion often starts when hydrogen gas is released during routine charging. In a tight engine area, that gas can linger and eat at metal parts. The result is white, blue, or green deposits on posts and contacts.
Color gives quick clues: green or blue usually points at copper, white at lead, zinc, or aluminum, and brown or red shows iron or steel is involved. Those colors help us judge how serious the problem is.
Visible buildup can cause slow cranking, no-starts, flickering power, or intermittent device failures. For small electronics, alkaline leaks leave potassium carbonate and hydroxide that sting skin and crust over contacts.
- Restore solid electrical contact today.
- Test the cell and terminals after cleaning.
- Act now to prevent brittle posts, damaged cables, and stressed alternators.
Our goal: clear the deposit, verify the source, and reduce the chance of facing the same issue again in a short time.
Safety first: gloves, eye protection, and a well‑ventilated work area
We start by making safety the priority: gloves on, eye protection in place, and fresh air flowing through the work area.
Protecting skin and eyes from alkaline residue and battery acid
Potassium hydroxide and battery acid can sting our skin and harm our eye if dust or splashes reach us. We wear rubber or nitrile gloves and keep goggles ready. If a splash occurs, we flush with water and seek help if irritation lingers.
Ventilation, hydrogen gas awareness, and avoiding sparks
We work outdoors or near an open window so hydrogen gas cannot build up around a car or charging unit. Keep ignition sources away and steady the workpiece before any prying or brushing.
Tools checklist
- Nylon brush, wire brush, small files, and cotton swabs
- Vinegar or lemon juice, baking soda with warm water, and isopropyl alcohol
- Needle‑nose pliers, small screwdriver, rags, and a disposable mat
We plan disposal for used rags and old cells so mess and corrosion dust stay contained. Slow, careful moves beat risky shortcuts every time.
How to clean battery corrosion on small devices
Our first move is to isolate power and remove spent cells with tools, not fingers. We power the device off, open the tray, and lever leaking cells out with a small screwdriver or pliers. Removed cells go straight into a sealed bag for disposal.
Power down, remove leaking alkaline batteries safely, and bag for disposal
Never touch crusted cells. Use gloves and keep the work area bright and ventilated.
Neutralizing residue: vinegar or lemon juice for alkaline leaks
We dab vinegar or lemon juice onto crusted spots with a small brush. The fizz loosens alkaline residue, and we wipe gently with cotton swabs.
Baking soda paste option: when a basic neutralizer makes sense
If a non‑acidic approach fits, we mix a tiny baking soda paste and apply carefully. Keep liquids controlled inside the compartment.
Detail cleaning: cotton swabs, small files, and careful wiping of the battery compartment
We use swabs, small files, and a soft brush to restore bright contact faces and clear grooves. Finish with a light wipe of isopropyl alcohol to remove oils and moisture.
Inspect springs and terminals. If a contact is beyond repair, we replace it rather than risk failure. Let the compartment air‑dry fully before testing.

- Quick tip: Keep a donor terminal handy for swift swaps.
- Result: We restore contact and reduce the chance of repeat problems.
Car battery terminals: cleaning, neutralizing, and reconnecting the right way
Before any wrench turns, we secure memory power and put on safety glasses and gloves. We disconnect the negative cable first, then the positive, and cover that post so tools can’t arc against it.
We mix a small scoop of baking soda with warm water in a cup and apply the slurry with a soft brush. Work away from raised vent caps so liquid does not enter the case.
Next, we scrub posts and clamp faces with a wire brush until metal shines. That metal‑to‑metal bite restores reliable starting and charging.
Take a few minutes to wipe and dry the tray and top of the case. Keep all liquid out of the cell holes and avoid pressing on vents.
- Reconnect in order: positive first, negative last, and torque clamps snug.
- Spray a corrosion preventative and place a ring of dielectric grease around the outside of the terminals, not between post and clamp.
- Skip soda tricks—Coca‑Cola leaves gummy residue that attracts grime and can harm nearby components.
Note: Persistent deposits may signal overcharging or a cracked case. After a quick clean, we run a charging‑system test if problems continue.
Neutralize, clean, and protect terminals for longer‑lasting results
Matching the remedy to the residue saves time and prevents damage. We keep the steps simple: pick the right neutralizer, remove deposits, dry, then protect the contact faces. This sequence helps any battery or device last longer and reduces repeat problems.
Vinegar or lemon juice vs. baking soda
For small electronics with alkaline leaks, a dab of vinegar or lemon juice neutralizes potassium hydroxide safely. We use the vinegar lemon juice option sparingly so moisture does not wick under labels or springs.
For automotive lead‑acid deposits, a little baking soda mixed with warm water lifts crust without harming the case. We apply just enough liquid, let the reaction work, and then wipe promptly.
Finish with isopropyl alcohol to remove oils and moisture
After the residue is gone, a quick wipe with isopropyl alcohol removes oils and speeds drying. That step helps us clean corrosion remnants and lowers the chance that grime returns in days.
Use purpose‑made cleaners and preventatives wisely
Commercial battery cleaner sprays can speed the job, but we still brush contact faces to restore conductivity. After reassembly, a light spray of a corrosion preventative or a thin film of dielectric grease on clamp exteriors keeps moisture at bay.
- Match neutralizer to the deposit.
- Apply minimal liquid and wipe fast.
- Dry and protect terminals before testing the battery.
Repairing or replacing damaged battery terminals in a device
When terminals show wear beyond light tarnish, we plan a careful repair or replacement. A quick, calm assessment saves time and lets us pick the right fix.

Assess damage: minor oxidation vs. severe corrosion
We inspect contact faces and springs. Minor oxidation buffs away with a small file or brush.
For deep pits or flaked metal, removal is safer than forcing a patch.
Sourcing replacement parts and fitting them in the compartment
We extract badly damaged terminals using a thin screwdriver and needle‑nose pliers. De‑solder or cut wires as needed, and note wire routing and polarity.
Then we source a compatible terminal from a donor holder or online and trim it with cutters or a Dremel so it seats in the compartment grooves.
Orienting, securing, and soldering for solid contact
Orient springs on the negative side and flats on the positive. Make sure polarity matches the device diagram before joining wires.
We tin wires and pads, solder clean joints, and check that the terminal sits proud enough to meet the cell without deforming the cover.
- Wipe away dust or acid traces around the compartment before fitment.
- Test with a fresh cell before closing the case so we can tweak the contact if needed.
Drying, reassembly, and testing before we button things up
With deposits removed, our next step is a careful drying and a quick function check.
We give the cleaned area a few minutes to air‑dry. A gentle blow from compressed air helps where water pools hide in corners of the compartment.
Next, we inspect for leftover residue. A small brush or swab lets us sweep out grit and missed flakes. If anything remains, we repeat the light scrub and dry sequence.
We then re‑seat terminals, clips, and covers carefully. We make sure wires sit free and are not pinched when the case closes.
Before final screws go in, we add cells and give the unit a function test. This saves time if an adjustment is needed. If the device or starter runs well, we finish tightening hardware so vibration won’t work parts loose.
Finally, we stow tools, note what we did, and keep the repaired area dry and debris‑free. A brief record makes the next check quicker and helps the battery fix last.
- Air‑dry or blow dry for a few minutes.
- Do a final pass with brush or swab.
- Test before fully buttoning up.
Disposal and recycling in the United States
With the mess contained, we plan disposal so hazards don’t come back home with us.
Place removed cells in a sealed bag right away. Americans discard more than three billion batteries each year; much of that ends up as hazardous trash if we are not careful.
Many states and counties require recycling. We look up local rules and find nearby drop‑off centers for household and car battery returns.
If skin meets battery acid, rinse with running water and seek medical advice. We wear basic protection while handling suspect cells and wash our hands after.
- We put used cells in a sealed bag so loose residue stays contained.
- We separate chemistries and label them for safe processing.
- We never toss a swollen, hot, or leaking cell in household trash; instead, we get rid through a local facility or an auto parts store that accepts cores.
Keep batteries corrosion‑free over time
A quick check every few months saves time and replacements later. We store alkaline batteries in a cool, dry spot, remove cells from devices we won’t use, and keep compartments dry before adding fresh cells.
We never mix old and new sets or brands. For cars, we inspect the car battery terminals twice a year. If we spot film or fuzz, we don gloves and use eye protection for a fast preventive pass.
Batch care makes this easy: a soft brush, a light baking soda rinse for a car top, a dab of vinegar or lemon for small gadgets, then an isopropyl alcohol wipe and a protective barrier. Keep a labeled kit handy and handle cells with care so our skin and tools stay safe.


