
We want our water flow to feel strong and steady. Over time mineral buildup and soap residue block tiny jets. The warm, humid bathroom can also harbor bacteria and mold, which reduces spray quality and comfort.
In this short guide we explain why performance drops and what that means for spray patterns. We outline simple tools and quick maintenance that fit busy lives. Our goal is a fresher fixture without replacing parts or calling pros.
We cover both leave-on and take-off methods so we can pick the best route for our spray nozzles and schedule. You will find safe soaking times, finish-friendly tips, and fixes for weak streams or drips. Follow these steps and enjoy a cleaner shower experience at home.
Key Takeaways
- Routine attention restores water pressure and spray quality.
- Simple supplies often suffice—no special tools required.
- Choose a leave-on or remove-and-soak method based on your fixture.
- Use finish-safe products and short soak times for best results.
- Quick monthly checks prevent buildup and keep our bathroom fresh.
Why We Clean Shower Heads: Health, Water Flow, and Comfort
Mineral scale and dark gunk form in warm, humid spaces and quietly steal water pressure and comfort. We notice uneven spray or weak jets long before we spot the white crust or black film. Regular attention keeps the fixture fresh and the experience pleasant.
Mineral deposits, limescale, and that stubborn slime
Mineral deposits and soap scum bond to the faceplate and trap debris. That sticky layer can hold organic matter that shelters bacteria and mold. In some cases, microbes hide in the black gunk behind nozzles.how-to-clean-a-pipe
How buildup hurts water pressure and spray patterns
Limescale narrows tiny openings, which lowers overall flow even when household pressure stays normal.
Slime films block chlorinated water from flushing irritants. Cleaning restores this self-rinsing effect and often fixes “weak shower” complaints without plumbing work.
- Visual cues: white crust, green stains, or dark residue.
- Clearing deposits keeps jets clear and improves water flow and comfort.
- A simple monthly routine prevents recurring buildup and preserves flow and water pressure.
What We’ll Use: White Vinegar, Baking Soda, and the Right Tools
Before we start, let’s lay out the vinegar, baking soda, and tools that matter. A clear plan helps us work faster and prevent damage to finishes.
Distilled white vinegar gives us predictable strength and fewer impurities, though general white vinegar works when diluted. For full soaks, we mix equal parts distilled white and water in a bowl so the scale softens without harsh chemicals.
Our simple kit fits most jobs: a plastic bag for on-head soaks, a bowl for full submersion, an old toothbrush for gentle scrubbing, and a soft cloth for wipe-downs that won’t scratch surfaces.
- Removal tools: an adjustable wrench, needle-nose pliers, and fresh Teflon tape for tight, leak-free threads.
- Placement tips: set the shower head nozzle-side up or on its side in a bowl so the solution reaches internal channels.
- Finish care: avoid abrasive pads or steel wool; even a scrubby sponge can mar chrome or plastic finishes in seconds.
Tool Safety and the Small Checklist
We cushion wrench jaws with a soft cloth, apply steady pressure, and never overtighten when reattaching. Inspect the screen and flow restrictor; use pliers or a toothpick gently if removal is needed.how-to-clean-a-toaster
“Use gentle tools, predictable solutions, and a short checklist so reassembly is quick and leak-free.”
Safety First: Cleaners and Techniques We Avoid
Some cleaners promise fast results, but a wrong choice can damage finishes and internal parts. We want solutions that protect the spray and the seals, not harm them.

We skip bleach, toilet bowl formulas, and harsh acids. These agents can corrode metal, etch chrome, and degrade rubber O-rings that keep water where it belongs.how-to-clean-fruit-with-baking-soda
Avoid abrasive pads and scrubbers. Tests show that even the scrubby side of a standard sponge will scratch a plastic chrome faceplate in only a few strokes. Those scratches invite grime and dull the finish.
- Keep harsh chemicals out of the bathroom air; steam can aerosolize residues we don’t want to breathe.
- Use gentle vinegar-based mixes as a safe method for mineral stains and scale.
- Work with soft cloths and an old toothbrush for nozzle work so the shower head looks good and lasts longer.
“Choose mild products and soft tools; it’s the best way to keep fixtures working and looking their best.”
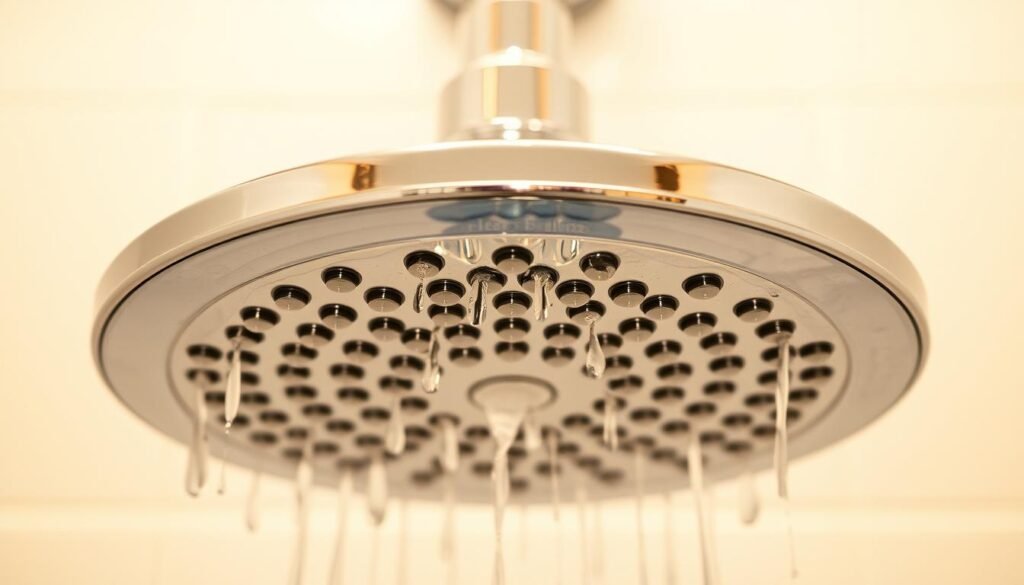
how to clean shower head with the Plastic Bag Method (No Removal)
A simple bag soak often clears stubborn jets without taking the fixture off.
We slip a sturdy plastic bag over the shower head and pour in a cup of white vinegar mixed with an equal part of warm water. The faceplate and nozzles sit in the solution so mineral scale softens in place.
Secure the bag with a twist tie or rubber band so the liquid hugs problem areas. Leave it for a few hours or overnight when buildup is heavy, then remove the bag and run hot water to flush loosened debris.
If any jets still sputter, we gently massage the nozzles with fingers or a soft toothbrush. Wipe the showerhead dry and check for even spray.
- Quick and tool-free: this method keeps the unit in place.
- Repeat as needed: target trouble spots with a short second soak.
- Finish strong: ventilate and run fresh water to clear the vinegar smell.
“This bag method refreshes spray fast and fits a busy schedule.”
Remove the Shower Head for a Deep Clean and Soak
For a thorough rinse and real results, removing the fixture for a deep soak often works best.
Unfasten safely: shut the water at the valve if needed. Cushion an adjustable wrench with a cloth and loosen the shower head at the arm without marring the finish. Peel away any old sealant tape and make sure threads are clean before reassembly.how-to-clean-a-whiteboard
Inspect screens and restrictors
Lift the small screen or flow restrictor with needle-nose pliers and tap out debris into a bowl. Use a toothpick carefully to nudge stubborn gunk without enlarging the mesh openings.
Vinegar soak and timing
Rinse the showerhead, then place it nozzle-side up or sideways in a bowl. Submerge in equal parts distilled white vinegar and water. Let the soak work overnight — this time dissolves mineral scale and loosens organic films.
Rinse, reassemble, and test
After soaking, rinse thoroughly and swab internal threads with a cotton bud. Wrap fresh Teflon tape, reattach the showerhead snugly, and turn on the water to flush. Check for leaks and adjust spray settings to confirm even, clear flow.
“A careful removal and a patient soak often bring a stubborn fixture back to full performance.”
- Cushion wrench jaws to protect finishes.
- Place the screen back gently after clearing.
- Use fresh tape and test water flow before finishing.
Tough Stains, Mineral Buildup, and Low Flow Fixes
When mineral deposits resist a soak, a gentle abrasive paste can finish the job. We mix baking soda with a splash of vinegar into a spreadable paste and apply it to stained areas.how-to-clean-mass-air-flow-meter

Use a soft brush. A soft-bristle toothbrush lifts deposits around the faceplate and between nozzles without scratching. Let the paste sit for about a minute, then scrub lightly.
Rinse with warm water and check problem jets. If low flow remains, we gently massage silicone tips and run a quick repeat paste pass on the stubborn spots.
When gentle metal polish makes sense
For solid metal trim, a tiny amount of Brasso can remove cosmetic stains. We ventilate the room and apply it sparingly. Never use metal polish on plastic-coated parts; that can haze the finish.
“Regular TLC prevents heavy buildup and keeps touch-ups simple.”
- Note what worked for your shower head and repeat the method next time.
- Test polishes on an inconspicuous area before wider use on your showerhead.
- If stains linger, one more brief soak plus another scrub usually clears the last deposits.
Weekly Touch-Ups and Monthly Routines to Keep Water Flow Strong
A quick post-use spray protects nozzles and keeps water flow steady. We find that small, regular steps save time and prevent heavy buildup. A two-minute weekly routine makes monthly work easier.how-to-clean-microfiber-couch
Quick after-shower spray to prevent deposits
Right after we finish, we mist the face with a white vinegar solution in a labeled bottle. Then we wipe the faceplate and gently massage nozzles with a soft brush or our fingers.
This short step slows scale and keeps jets clear. It takes little time and fits into our regular cleaning shower habits at home.
Monthly soaks to keep nozzles and jets clear
Once a month we plan a deeper soak using the bag or bowl method. An overnight soak often restores even spray and improves water flow.
Make it easy: keep a small caddy near the tub with rubber bands, a soft cloth, and an old brush. Pick a weekend time that works and mark it on the calendar so we are not rushed.
- Weekly: two-minute mist, wipe, and nozzle massage.
- Monthly: bag or bowl soak overnight for stubborn deposits.
- Keep supplies in a handy place so routines stick.
“Short, steady care keeps shower heads fresh and saves work later.”
Troubleshooting: Irregular Spray, Debris, and Leaks
When a jet sputters or a seam weeps, small fixes often restore steady performance without calling a plumber. Start with a quick inspection and simple steps that target the usual trouble spots.
Clearing nozzles and removing remaining debris
Gently rub the nozzles to dislodge mineral grit, then run water and watch pressure and flow. If the problem stays, check the inlet screen for compacted debris.how-to-clean-oven-glass
Lift the screen or gasket carefully with needle-nose pliers. Use a toothpick to remove remaining particles without widening the mesh. Rinse well and use a cotton swab on internal threads after a soak.
Avoid abrasive tools that scratch finishes; those scratches trap more grime and hurt long-term performance.
Refreshing Teflon tape and resealing to prevent drips
Pull off old sealant tape from the arm and make sure threads are clean. Wrap fresh Teflon tape neatly in the correct direction and reattach the shower head snugly.
After we remove shower and reinstall, run water and watch for leaks at the joint. A small tightening usually stops seepage without over-torquing.
- Diagnose by massaging nozzles, then test pressure and flow.
- Remove the screen if the head-only flow is low; clear debris gently.
- Soak again if stains persist, flush, and retest all jets.
- Note recurring clogs as a sign of hard water; increase maintenance frequency if needed.
“Small checks and careful resealing keep water flowing and stops drips before they start.”
Enjoy a Cleaner, Healthier Shower—Starting Today
a strong, simple routine saves time and protects our bathroom fixtures. A quick weekly mist and wipe plus a monthly soak in equal parts distilled white vinegar and water keep mineral deposits and buildup at bay.
We keep a small caddy at home with a bag, soft cloth, a toothbrush, and a vinegar solution so touch-ups take minutes. Spot-treat stains with baking soda on the brush, rinse, and dry.
When we remove shower head parts, we inspect the screen, wrap fresh Teflon tape, and put the head back carefully to stop leaks. The bag trick fits busy days; a full soak works when we have more hours.
Routine care reduces bacteria, restores water flow, and makes every shower feel better.how-to-clean-pizza-stone


One Response