
Nearly 70% of home cooks say a dull basin makes their whole kitchen feel tired. I was surprised the first time I measured the difference a simple routine made. In minutes I bring a dull surface back to a bright, streak-free finish using pantry items and clear steps.
First, I empty the basin so I can reach corners and around the drain. Then I sprinkle baking soda, add a little dish soap, scrub with the grain, rinse with warm water, and dry. This quick sequence boosts shine and protects the finish.
I avoid steel wool and bleach because they scratch and harm the surface. Quick daily rinses stop odors and buildup, and a baking soda refresh every one to two weeks restores a like-new gleam.
This guide is practical and gentle. I keep a few items handy so upkeep fits my routine, and I share tips for stubborn spots and safe commercial options like Bar Keepers Friend when needed. Follow along and you’ll get a reliable routine that makes your sink look polished without special equipment.
Key Takeaways
- Use baking soda, dish soap, and warm water for a fast, effective clean.
- Empty the basin first to reach edges and the drain area.
- Avoid abrasive tools and bleach to protect the finish.
- Rinse daily and dry to prevent water spots and odors.
- Deep clean with baking soda every 1–2 weeks for best results.
- Commercial cleaners like Bar Keepers Friend can help with stubborn stains.
- Keep the routine simple so upkeep becomes effortless at home.
For a full step-by-step method and more tips, see my detailed routine at this guide.
Why a Stainless Steel Sink Needs the Right Cleaning Approach
A durable basin still needs gentle handling to keep its finish from wearing thin. I treat the surface with respect because tiny scratches add up and make a kitchen look tired quickly.
I always rinse away loose grit with running water before I touch the surface. That simple step prevents particles from digging in when I scrub.how-to-clean-silver
Working with the grain keeps the brushed finish even. I avoid circular motions that can dull the look and make scratches more visible.
I skip bleach and steel wool. Harsh chemicals and abrasive pads can discolor or score the metal. Drying the basin after rinsing also helps reduce water spots and mineral buildup.
- Rinse debris first to avoid micro scratches.
- Use gentle tools and follow the grain.
- Avoid bleach and metal scouring pads.
- Dry after rinsing to prevent spots and corrosion.
| Common Mistake | Why It Hurts | Safer Option |
|---|---|---|
| Scrubbing over grit | Creates deep micro scratches | Rinse first, then use a soft cloth |
| Using bleach | Can discolor and damage the finish | Mild detergent or a vinegar solution |
| Steel wool or stiff brushes | Leaves visible scores and dulls surface | Non-abrasive pad or microfiber cloth |
| Skipping regular wipes | Allows mineral deposits and odors | Quick rinse and dry after use |
For a fuller care routine and safe product options, I link my trusted guide on maintenance at stainless steel sink care.
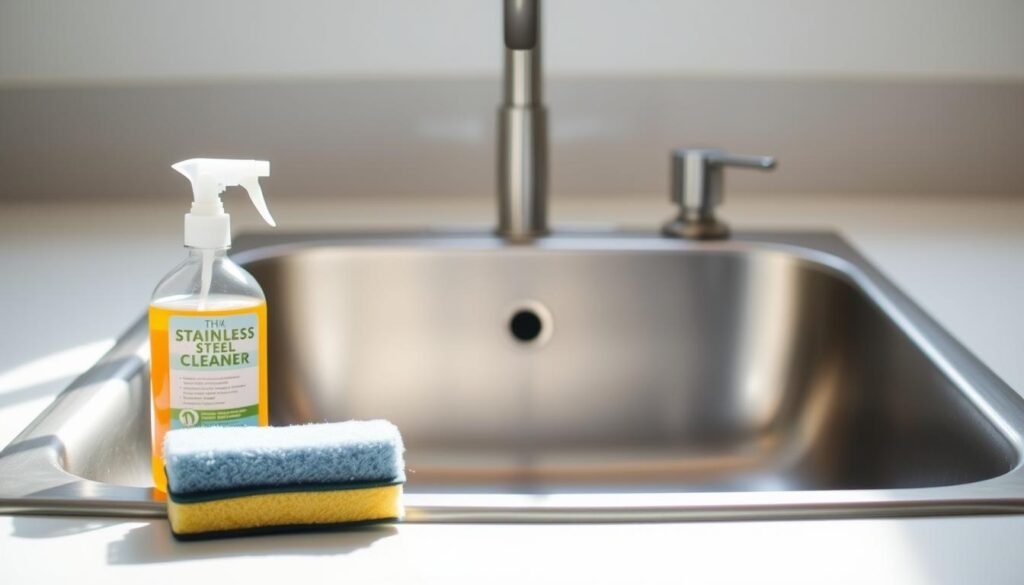
What I Use and How I Prep the Area

I gather a few pantry staples and a soft cloth before I start—simplicity keeps the process quick.
Essential supplies are baking soda, a squirt of dish soap, warm water, and a microfiber cloth. I keep these in a small caddy so they’re ready when I need a quick refresh.how-to-clean-iphone-charging-port
First, I clear the area: dishes out, trays and caddies removed. Then I rinse the basin to get rid of sand-like grit that can scratch the stainless steel surface when I scrub. This small step protects the finish.
I sprinkle baking soda over the damp surface and add a drizzle of soap. If the paste feels too thick, I add a touch of water until it spreads easily. I use my fingertips or a soft cloth so I can feel rough spots and target buildup gently.
Finish by rinsing residue away and buffing dry with the microfiber cloth. Drying prevents water marks and keeps the steel surface looking fresh. This prep works for single and double steel sinks alike.
| Item | Purpose | Tip |
|---|---|---|
| Baking soda | Gentle abrasive for grime | Sprinkle on damp surface, make paste |
| Dish soap | Breaks down grease | Use sparingly with baking soda |
| Microfiber cloth | Buffs dry, removes streaks | Keep one dry for final polish |
| Warm water | Rinse and adjust paste | Helps get rid of particles before scrubbing |
How to Clean Stainless Steel Sink

I start each session by emptying the basin and checking for crumbs or grit. This keeps particles from scratching the finish when I scrub.
Sprinkle baking soda over a damp surface so the powder spreads evenly. I use a light dusting rather than a thick pile so the paste forms smoothly.
Next, I add a small drizzle of dish soap and rub with my fingers until a gritty paste develops. If it feels too stiff, a few drops of water loosens the mix so it glides under my cloth.
- Scrub with the grain, moving steadily and reaching corners, rims, and around the drain.
- Rinse away the paste with warm water and scan for missed spots; repeat a targeted sprinkle-and-scrub if needed.
- Buff dry with a clean microfiber cloth for a streak-free shine and fewer water marks.
Daily habits matter: a quick rinse and wipe after use cuts down on buildup and keeps the basin bright between deeper sessions. For a full routine I recommend this concise guide at Martha Stewart.
| Step | Why it matters | Quick tip |
|---|---|---|
| Empty basin | Prevents grit from scratching the metal | Remove dishes and rinse first |
| Apply baking soda + soap | Creates gentle abrasive paste | Use a light dusting and small soap drizzle |
| Scrub with the grain | Keeps finish even and avoids new marks | Use fingertips or a soft cloth for corners |
| Rinse and dry | Removes residue and reduces spots | Buff with a microfiber cloth until it gleams |
Tackling Stains, Limescale, and Common Mistakes

Tough marks and mineral build-up need a calm, deliberate approach. I use mild acids and gentle motion rather than more forceful scrubbing.how-to-clean-makeup-brushes
For stubborn stains, I swap dish soap for white vinegar or a baking soda paste. The fizz from a small sprinkle of baking soda mixed with a splash of vinegar loosens residues without aggressive abrasion.
Stubborn stains
- I apply a baking soda paste, add a little white vinegar, let the fizz work for a minute, then scrub with the grain.
- For really stubborn spots, I reach for a dedicated cleaner like Bar Keepers Friend and use it lightly along the grain.
Limescale and hard water marks
- I dilute vinegar 1:10 with water, apply along the grain on affected areas, let it sit briefly, then rinse away and dry with a microfiber cloth.
- In hard water regions, prompt drying prevents fresh limescale from forming.
Shine boosters and tools
- Lemon juice or a glass cleaner lifts fingerprints and adds shine; I buff dry with a soft cloth.
- I avoid wire wool and bleach — they cause scratches and discoloration. I only use non-scratch scouring pads when necessary.
“Give cleaners a little dwell time; it lets chemistry do the work so you need fewer scrubs.”
Final tip: test the mildest method first, work with the grain, rinse thoroughly, and dry. That way the finish stays bright and you get rid of buildup without accidental damage.
| Problem | Best approach | Quick tip |
|---|---|---|
| Stubborn stains | Baking soda + white vinegar or mild stainless cleaner | Let fizz sit, scrub with grain |
| Limescale | Diluted vinegar (1:10) | Rinse away and dry promptly |
| Fingerprints/shine | Lemon juice or glass cleaner | Buff with a soft cloth |
Conclusion
Small, regular habits make a noticeable difference in my kitchen’s look. I stick with a weekly or biweekly baking soda routine and brief daily cleaning touches — a quick rinse, a light wipe, and a dry — so the basin stays bright and hygienic.
I keep a microfiber cloth handy for buffing fingerprints and water marks, and I avoid bleach and abrasives so the finish lasts. For deeper work I use a dedicated cleaner or a targeted weekly deep clean at this resource, and I follow a practical stainless steel sink care guide at this maintenance guide. Small steps, repeated, keep surfaces looking polished for years.


